Hosting your own fully featured Docker registry

Table of Contents
Background
Recently, I’ve become more interested in Docker containers and registries.
This is from a combination of dealing with these daily at work and publishing my
own containers publicly. I thought it
would be neat to publish my containers on my own private registry,
on my own domain name. For example,
instead of docker pull ghcr.io/nathanvaughn/webtrees
it would be docker pull cr.nathanv.app/webtrees.
Part of this is my constant desire to host non-critical services myself
(by critical, I mean like email, calendar, git, etc.), part is a desire to remove
my dependence on Docker Hub (I don’t fully trust their ability to stay around forever,
given them locking more features behind paid tiers,
adding more aggressive rate limits, etc.). Additionally, outages are extremely disruptive,
due to how the Docker client works* and it using index.docker.io
as the default registry.
* Whenever you try to build a Docker image that bases off another image with FROM,
Docker will always try to fetch the hash of the tag you have used to see if there’s
a newer version available. If Docker can’t connect to the registry to check this,
it fails and will refuse to build your image, even if you already have the
base image locally. In my opinion, this is a colossally stupid design decision.
At work, this caused all of our Docker builds to fail because
Docker Hub was down, even though our build agents had the images already pulled.
We quickly made copies of all our base images to our own registry.
What is a Registry
First off, we need to understand what a Docker registry is. At its core, a registry
is just a web server with some API endpoints that returns and accepts JSON and files.
That’s really about it. The full specification for a registry is defined
here. In terms of a web UI
or authentication, that is not handled by the core registry software and is left
to the administrator to provide, if desired. While the “official” registry software is
here, as the specification
is freely available, anyone can implement their own. This means that a barebones Docker
registry is just a bit of software that has no user interface, and anyone can
docker push to or docker pull from.
Search
With this in mind, I wanted to run my own registry that had a nice web UI for public browsing and I could sign in with via SAML or OIDC (Open ID Connect, basically OAuth) (the two protocols that Keycloak provide). In my mind, this shouldn’t be too difficult, as I thought lots of tech companies run their own internal registries with similar requirements. Oh how wrong I was.
Serverless Registry Proxy
When I first casually was interested in hosting container images on my own domain name, Cloudflare’s Argo Tunnel still charged per gigabyte of bandwidth, so I was more interested in having something hosted for me. Initially, I had looked into using this in order to serve a registry on my own domain name, but really be hosted elsewhere, much like how I use GitHub Pages for my homepage and this blog. However, there are two problems with this software that prevented me from using it.
- This acts as a reverse-proxy, thus all traffic between the user and the registry go through it. When setup as an AWS Lambda Function or other serverless function, the bandwidth fees can get quite expensive.
- The Docker client does not follow redirects. I tried to rewrite this in Python to instead serve 301 redirects rather than proxying traffic to save on bandwidth costs, but it did not work.
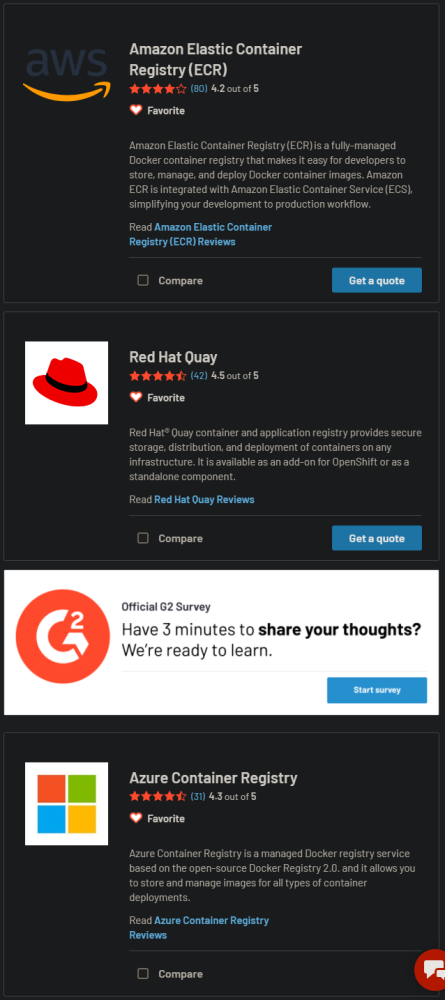
Amazon ECR Public
Next, I started to look into other hosted registries. The first thing I tried was
Amazon Web Service’s Amazon Elastic Container Registry Public (what a mouthful).
While free and with generous limits,
the URL scheme is like public.ecr.aws/<random string>/<container>
and there’s no way to add a custom domain name.
While it seems neat if you are fully-invested in the AWS ecosystem,
this doesn’t really provide any advantages over Docker Hub or GitHub Container Registry.

Azure Container Registry
I’m most familiar with this and looked into using it for myself.
Unlike most hosted container registries, you get a custom subdomain. So instead of
azurecr.io/<name>/<container> you get <name>.azurecr.io/<container>.
However, it lacks a public web UI browser, it costs
$0.16/day
for the most basic plan (at time of writing), and only
supports custom domain names
with a Premium subscription. This was far too expensive and restrictive
for what I wanted. Cloudflare Argo Tunnel was still a paid product so my
search ended here, for now.
Harbor
After Cloudflare Tunnel was made free, I began looking into hosting my own registry on my own hardware. One of the first self-hosted registry softwares I came across was Harbor by VMWare. It seemed to have a lot of the features I was looking for. OIDC sign-in and all-in-one registry and web UI for management. The real problem for this for me was that they’re very adamant that you use their installer. There’s no mention of how to setup a Docker-compose stack (which is how I currently manage all of my applications). I really want a little bit more DIY setup process as I want to be able to connect software to my existing databases and reverse proxy. I do this via a shared Docker network that containers can be connected to. Additionally, I like to use Docker named volumes as it makes centralized backups easier. There’s no ability to configure any of this in Harbor, nor is it easy to reverse-engineer as the installer creates a Docker-compose stack and a whole mess of folders and data. I quickly abandoned this idea as I thought the effort of reverse-engineering this would not be worthwhile and create an extremely fragile setup.
Portus
The first piece of software I really tried and spent to time to setup was
Portus by the SUSE team. It seemed really promising. It acts as an authorization server
that can connect to an OIDC provider, and gives a registry management web interface.
It doesn’t really have a nice public registry browser, but I was already striking
out so this looked promising. However, this ended up being a massive timesink.
First off, the official website has an invalid SSL certificate (not a good sign)
and the GitHub repository hasn’t had a meaningful code contribution in nearly 2 years.
To make it worse, a number of the official Docker images just flat out wouldn’t
run for me, with errors indicative that the image was built incorrectly (like exec.go
errors that usually arise when you screw up your entrypoint).
Portus requires 2 separate containers to run (a web UI and a background worker)
together but I couldn’t even get the same version of both to work
(they’re the same container image, just a different entry command).
Even with my cobbled together stack “running” it was extremely buggy and unstable.
As much as I wanted it to work out, it just didn’t.
For example, the error log from the background worker when an image was pulled:
Handling 'pull' event:

{
  "id": "741edeb4-74b7-4548-a4fb-ec68fc26340a",
  "timestamp": "2021-05-19T00:30:35.682369244Z",
  "action": "pull",
  "target": {
    "mediaType": "application/vnd.docker.distribution.manifest.v2+json",
/srv/Portus/vendor/bundle/ruby/2.5.0/gems/activerecord-4.2.11/lib/active_record/dynamic_matchers.rb:26:in `method_missing': undefined method `handle_pull_event' for #<Class:0x000000000502ca88> (NoMethodError)
    "size": 5953,
	from /srv/Portus/app/models/registry_event.rb:35:in `block in handle!'
	from /srv/Portus/app/models/registry_event.rb:35:in `each'
	from /srv/Portus/app/models/registry_event.rb:35:in `handle!'
    "digest": "sha256:1a9090d9ed08eab0c35a0f86bba8d754f9ac233a1634dbffd110d884ad04d5e2",
	from /srv/Portus/lib/portus/background/registry.rb:30:in `block in execute!'
    "length": 5953,
	from /srv/Portus/vendor/bundle/ruby/2.5.0/gems/activerecord-4.2.11/lib/active_record/relation/batches.rb:51:in `block (2 levels) in find_each'
    "repository": "webtrees",
	from /srv/Portus/vendor/bundle/ruby/2.5.0/gems/activerecord-4.2.11/lib/active_record/relation/batches.rb:51:in `each'
    "url": "https://cr.nathanv.app/v2/webtrees/manifests/sha256:1a9090d9ed08eab0c35a0f86bba8d754f9ac233a1634dbffd110d884ad04d5e2",
    "tag": "latest"
	from /srv/Portus/vendor/bundle/ruby/2.5.0/gems/activerecord-4.2.11/lib/active_record/relation/batches.rb:51:in `block in find_each'
  },
	from /srv/Portus/vendor/bundle/ruby/2.5.0/gems/activerecord-4.2.11/lib/active_record/relation/batches.rb:124:in `find_in_batches'
  "request": {
	from /srv/Portus/vendor/bundle/ruby/2.5.0/gems/activerecord-4.2.11/lib/active_record/relation/batches.rb:50:in `find_each'
    "id": "54a7cfa9-d439-4765-add4-df67d7b13dd2",
	from /srv/Portus/lib/portus/background/registry.rb:28:in `execute!'
    "addr": "172.19.0.1",
	from /srv/Portus/bin/background.rb:58:in `block (2 levels) in <top (required)>'
    "host": "cr.nathanv.app",
    "method": "GET",
	from /srv/Portus/bin/background.rb:56:in `each'
    "useragent": "Ruby"
	from /srv/Portus/bin/background.rb:56:in `each_with_index'
  },
	from /srv/Portus/bin/background.rb:56:in `block in <top (required)>'

  "actor": {
	from /srv/Portus/bin/background.rb:55:in `loop'
    "name": "portus"
	from /srv/Portus/bin/background.rb:55:in `<top (required)>'
  },
	from /srv/Portus/vendor/bundle/ruby/2.5.0/gems/railties-4.2.11/lib/rails/commands/runner.rb:60:in `load'
	from /srv/Portus/vendor/bundle/ruby/2.5.0/gems/railties-4.2.11/lib/rails/commands/runner.rb:60:in `<top (required)>'
  "source": {
	from /srv/Portus/vendor/bundle/ruby/2.5.0/gems/railties-4.2.11/lib/rails/commands/commands_tasks.rb:123:in `require'
    "addr": "301218b93e26:5000",
	from /srv/Portus/vendor/bundle/ruby/2.5.0/gems/railties-4.2.11/lib/rails/commands/commands_tasks.rb:123:in `require_command!'
    "instanceID": "491d5a80-d4cf-47f3-af64-a383e513c903"
	from /srv/Portus/vendor/bundle/ruby/2.5.0/gems/railties-4.2.11/lib/rails/commands/commands_tasks.rb:90:in `runner'
  }
	from /srv/Portus/vendor/bundle/ruby/2.5.0/gems/railties-4.2.11/lib/rails/commands/commands_tasks.rb:39:in `run_command!'
}
	from /srv/Portus/vendor/bundle/ruby/2.5.0/gems/railties-4.2.11/lib/rails/commands.rb:17:in `<top (required)>'
	from bin/rails:12:in `require'
	from bin/rails:12:in `<main>'

exit status 1
This caused it to crash.
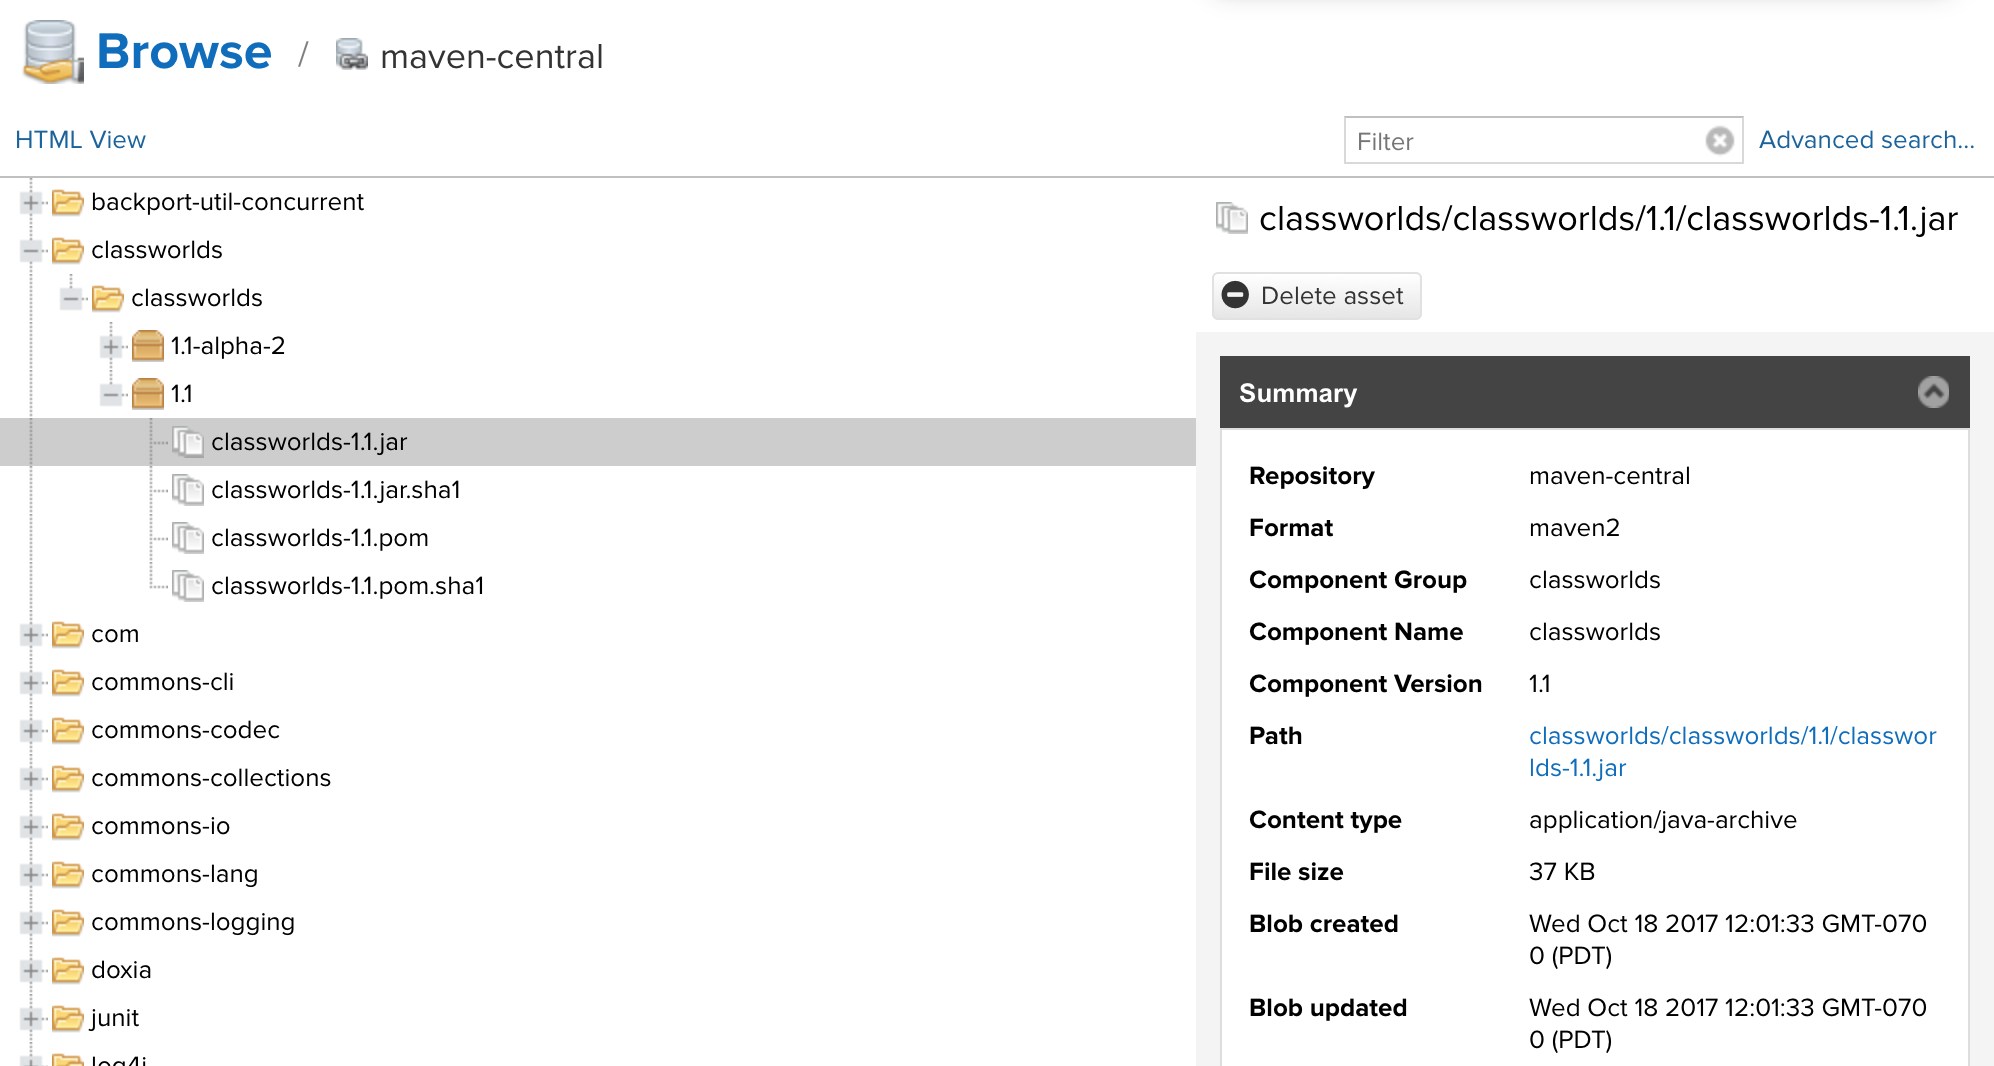
Sonatype Nexus Repository Manager 3
After the failure of Portus, the next software I tried was Sonatype’s Nexus Repository Manager 3 (another mouthful). This is pretty cool software. It’s a universal package repository, like JFrog Artifactory, ProGet, or Azure Artifacts. I played with this some, but it had a few downsides. First and foremost, while self-hosted, only LDAP is supported as a form of single sign-on in the free version. SAML authentication requires a license. While it does have a web UI for browsing the registry, it’s very basic and pretty bland. This isn’t really a negative against it, but the permissions system is very complex and way more complicated than what I needed for a single-user deployment, and I struggled a lot with them. Lastly, the application is also very heavy as it runs an Elasticsearch instance inside the container among other services. Nice software, but just not what I was looking for and super overkill for what I was trying to do.
GitLab Container Registry
Starting to get desperate, I investigated GitLab’s container registry. This is part of the GitLab application as a whole. I didn’t install it, but from reading their documentation, this seems to be heavily based around the “projects” you have in GitLab, thus I would need to make mirrors of all of my containers as GitLab projects. I’m not interested in moving my code to my own GitLab instance, so I decided to shelve this for now. However, being able to sign-in to my registry with GitLab (which supports a ton of different connections like LDAP, OIDC, etc.) was going to be a huge plus.
Quay
Last, but certainly not least is Quay. Spoiler alert, Quay is what I ended up going with. I didn’t find Quay earlier because when I searched for self-hosted registry software, Quay would come up, but I thought it meant Quay.io which is Red Hat’s public instance of the Quay software.
Quay is pretty cool software. It’s a self-hosted Docker registry and web UI, and a lot like Docker Hub. Users can create accounts and have their own namespace, and it supports lots of different authentication providers. If you want to see what it looks like, just see Quay.io. It’s fully free and open-source and developed by Red Hat. It checked all the boxes I wanted, so I decided to go with it.
Setup
Now, I’ll discuss getting Quay setup (the meat of this article).
Disclaimer
This is not a fully secure production-ready setup. Quay recommends setup certificates
in the application itself rather than using a reverse-proxy.
Communication between containers should also be secured,
though they are not in this example.
Additionally, using some sort of blob storage is highly recommended
rather than local filesystem storage. Finally, you should pin the versions of
the containers you’re using, I’m just showing latest as an example.
Quay
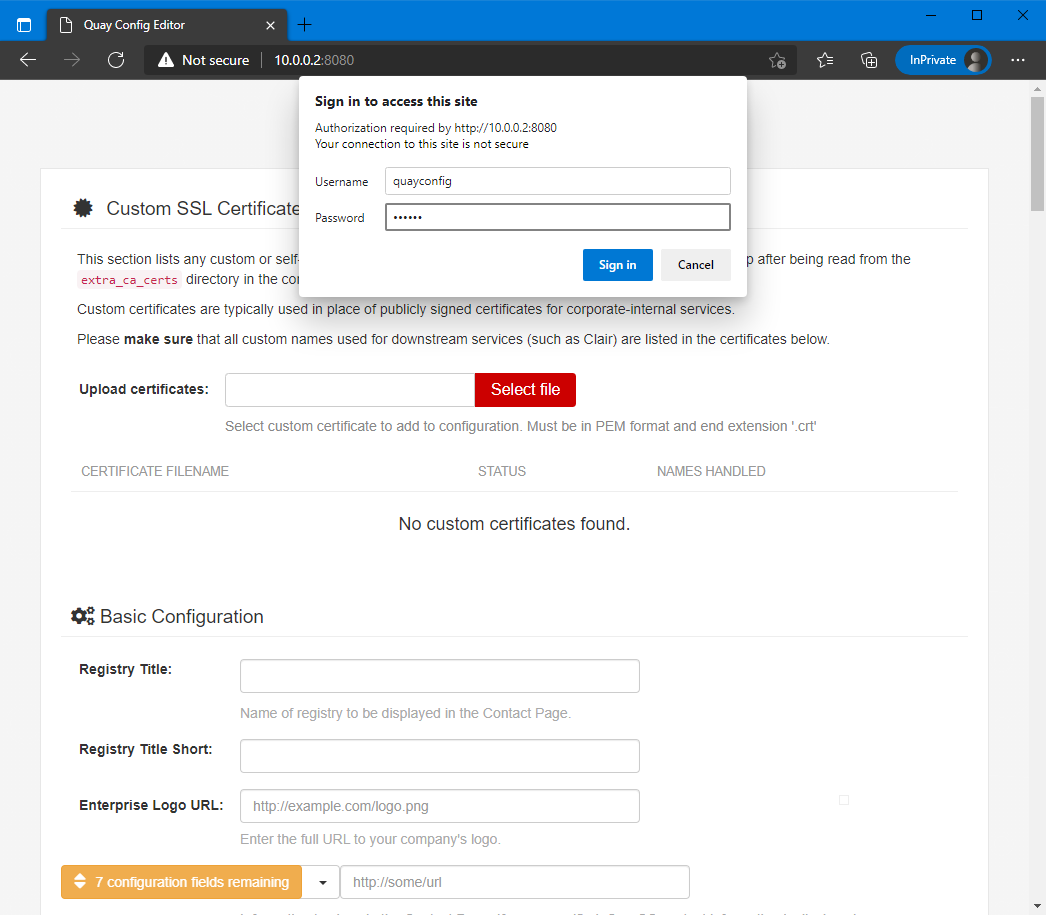
Setting up Quay is a bit different than most Docker-based software. You need to launch the container one time in a config mode, which allows you to generate a config file, that you’ll then feed to the container.
To do this, launch the container with the command config <password>.
1services:
2  config:
3    command: config secret
4    image: quay.io/projectquay/quay:latest
5    ports:
6      - 8080:8080
7    volumes:
8      - app_config:/conf/stack
When you open <ip>:8080 in your web browser, you’ll be prompted to sign in.
Enter the user quayconfig and the password you selected.
Fill out the configuration. Item to note, while Quay supports MySQL, I had issues
setting this up, and found using PostgreSQL to be easier
(and Clair needs PostgreSQL anyways, more on that later). Just make sure to add the
pg_trgm extension to the PostgreSQL database you create. Example:
The options inside the configuration are extensive, so I’m not going to go over all of them. The full documentation is available here.
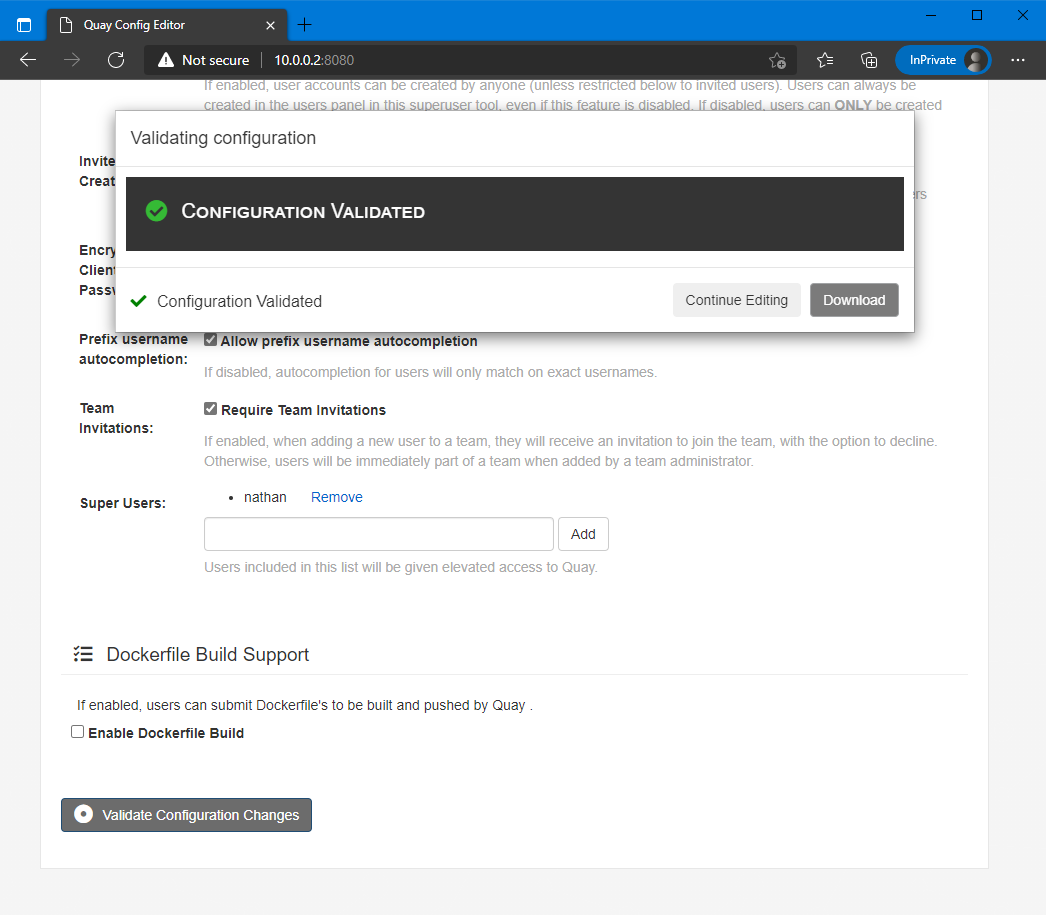
An important option is enabling non-superuser creation. If you have it setup as I do to only allow sign-ins through an external authentication provider, Quay needs to create an account the first time a user signs in. You should allow account creation, and restrict sign-ins at your identity provider. That way as long as someone can sign in with your authentication service, they can sign in to Quay, and Quay will create an account as needed.
After you finish filling out the configuration, validate the configuration at the bottom of the page and download the configuration.
Before you put this config inside the Quay container, there are a few important options not available in the UI, that you can change manually.
1# adds gravatar avatars
2AVATAR_KIND: gravatar
3# this defaults to true, but allows you to omit the
4# user/org part of a container namespace, and have it interpreted as "library".
5# For example: `quay.io/library/python` will be equivalent to `quay.io/python`.
6FEATURE_LIBRARY_SUPPORT: true
7# allows users to rename account
8FEATURE_USER_RENAME: true
Now place this inside the /conf/stack/ folder of your container.
1# recommended way
2sudo docker cp config.yaml quay_config_1:/conf/stack/
3
4# janky way
5sudo cp config.yaml /var/lib/docker/volumes/quay_app_config/_data/
Relaunch the container without the config command, and you’re set (it will
probably take a few minutes to start up the first time)!
 1services:
 2  app:
 3    image: quay.io/projectquay/quay:latest
 4    ports:
 5      - 80:8080
 6      - 443:8443
 7    restart: unless-stopped
 8    volumes:
 9      - app_storage:/datastorage
10      - app_config:/conf/stack
11      - app_log:/var/log
12      - app_tmp:/tmp
13
14volumes:
15  app_storage:
16    driver: local
17  app_config:
18    driver: local
19  app_log:
20    driver: local
21  app_tmp:
22    driver: local
23  clair_config:
24    driver: local
If you decided to leave the library support enabled earlier, you’ll need to create and organization or user with this name in order for it to work. Personally, I recommend creating an organization, and adding your account to it.
Mirror
So, now that you have Quay setup, you may have a desire to mirror some public containers to your own registry. Unfortunately, Quay does not support acting as a pull-through cache, however you can mirror specific containers and tags into your Quay instance.
To enable this, relaunch Quay in configuration mode and enable repository mirroring.
Additionally, make sure you have FEATURE_RATE_LIMITS set to false. If you have
this enabled, it enforces some strict rate limits (even on itself) that can cause
repository mirroring to fail. Copy the new config back into the container.
Now, you need to start a second container to act as a mirroring worker. This is the
same image as the main container, just run with the repomirror command.
Make sure it shares the same volumes/bind mounts as the primary container.
 1services:
 2  app:
 3    image: quay.io/projectquay/quay:latest
 4    ports:
 5      - 80:8080
 6      - 443:8443
 7    restart: unless-stopped
 8    volumes:
 9      - app_storage:/datastorage
10      - app_config:/conf/stack
11      - app_log:/var/log
12      - app_tmp:/tmp
13
14  mirror:
15    command: repomirror
16    depends_on:
17      - app
18    image: quay.io/projectquay/quay:latest
19    restart: unless-stopped
20    volumes:
21      - app_storage:/datastorage
22      - app_config:/conf/stack
23      - app_log:/var/log
24      - app_tmp:/tmp
25
26volumes:
27  app_storage:
28    driver: local
29  app_config:
30    driver: local
31  app_log:
32    driver: local
33  app_tmp:
34    driver: local
Now you can create a mirrored repository.
⚠ Warning ⚠: I would be extremely careful of starting both the main Quay container and the mirror worker at the same time. When starting a new setup from scratch, or upgrading the versions, the first thing Quay does is create/migrate the database schema. Having two containers do this at the same time will end poorly, and usually results in a corrupted state. Start one container, let it migrate the database, then starts the other.
Clair
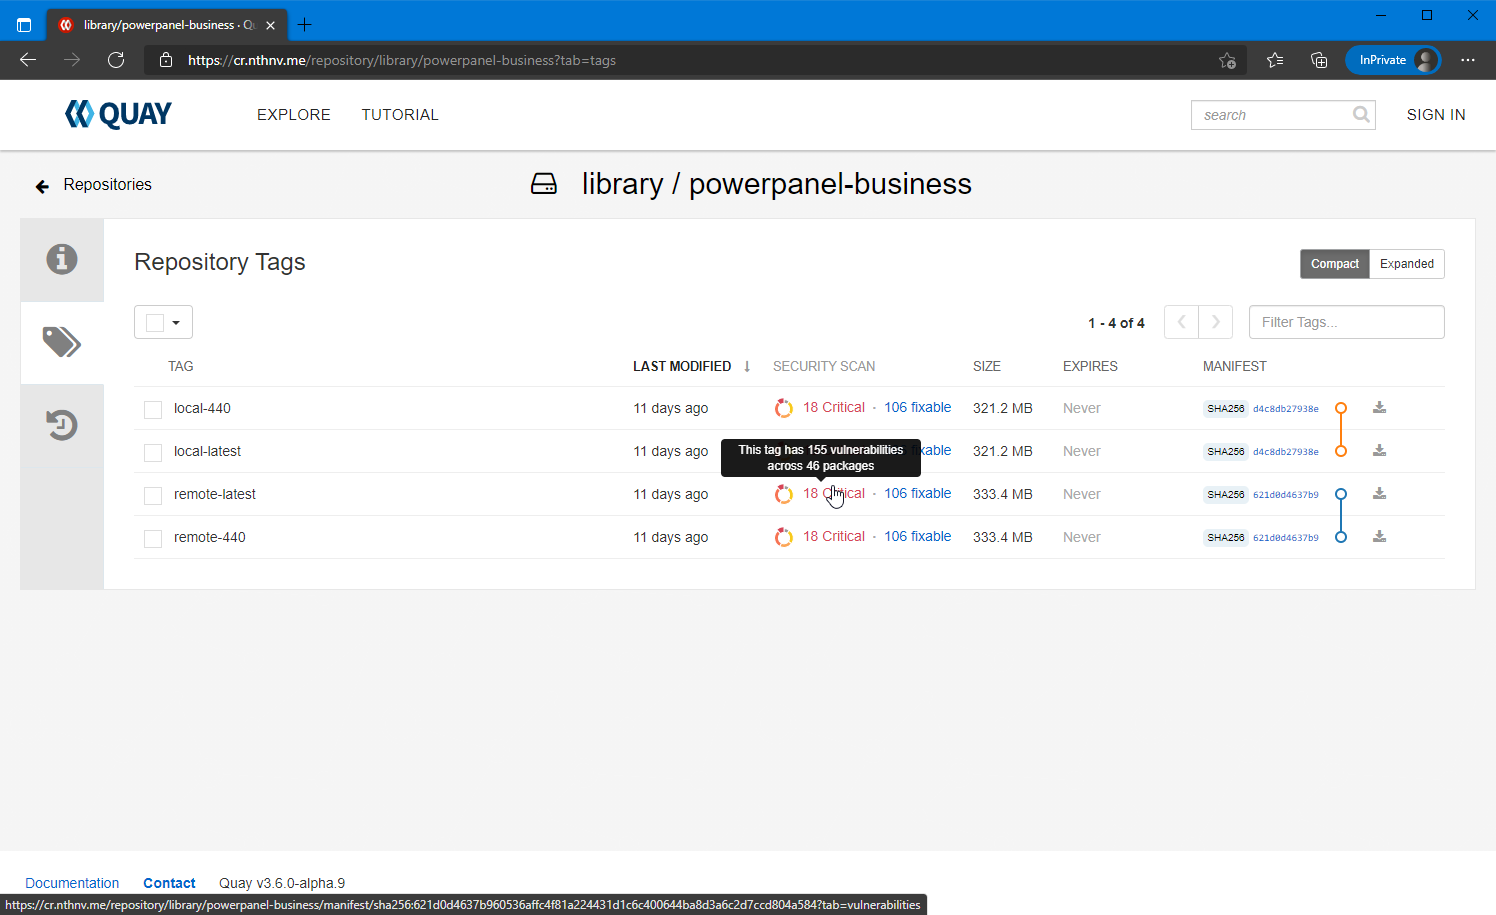
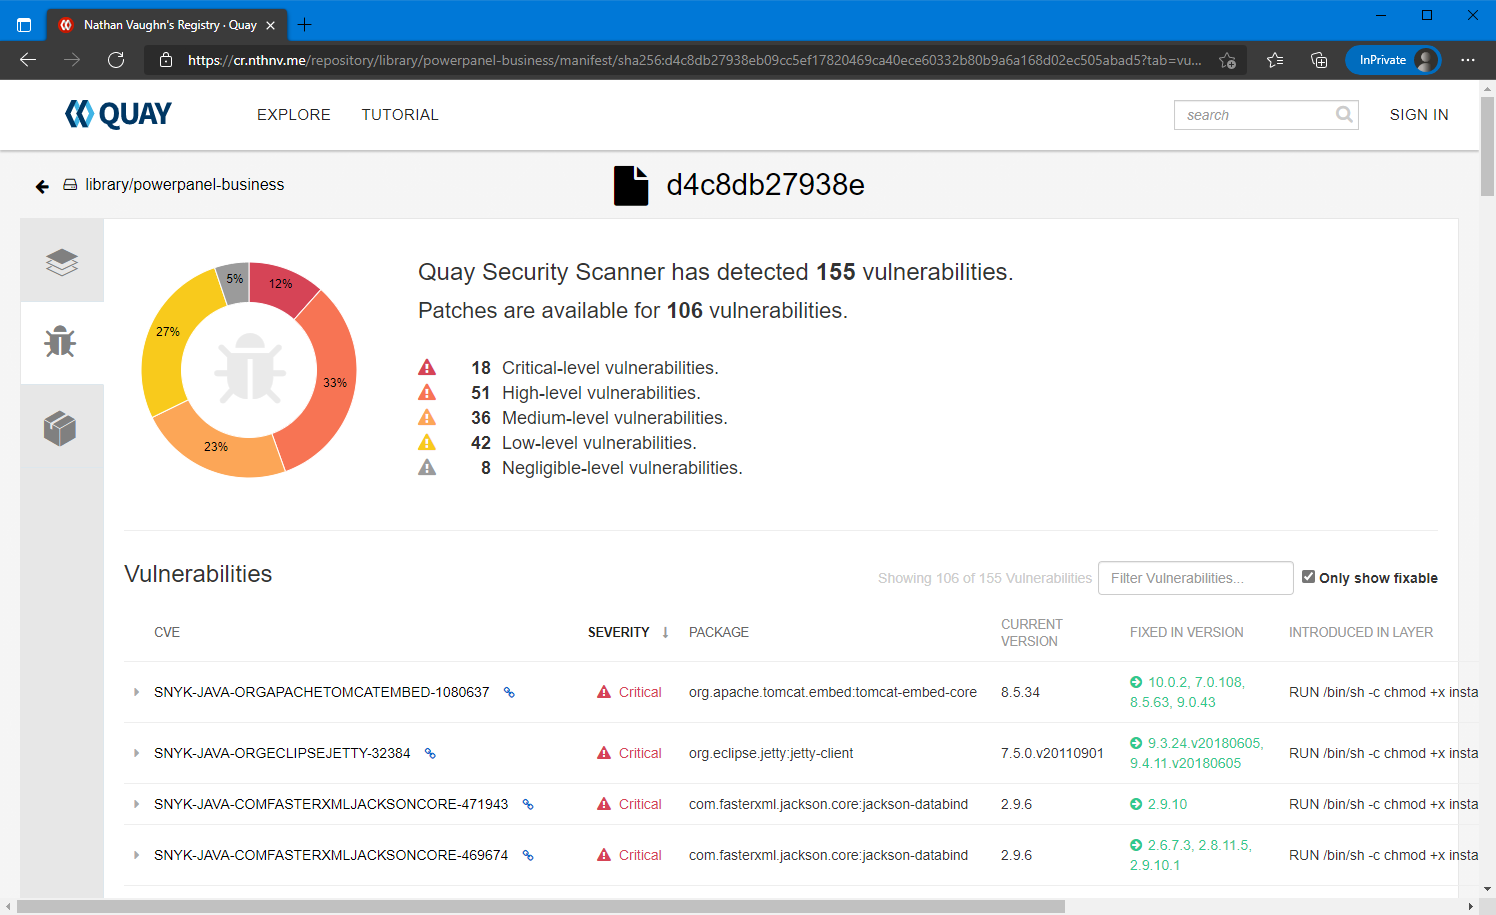
Now that Quay is setup with repository mirroring, we can top it off with vulnerability scanning from Clair. Clair is a static vulnerability analysis tool for containers, also developed by the Quay team. When combined with Quay, you can see the vulnerabilities in containers right in the web UI for the registry. This is pretty sweet, because all the hosted registries I know of charge you extra for vulnerability scanning, and this is integrated directly into Quay for free.
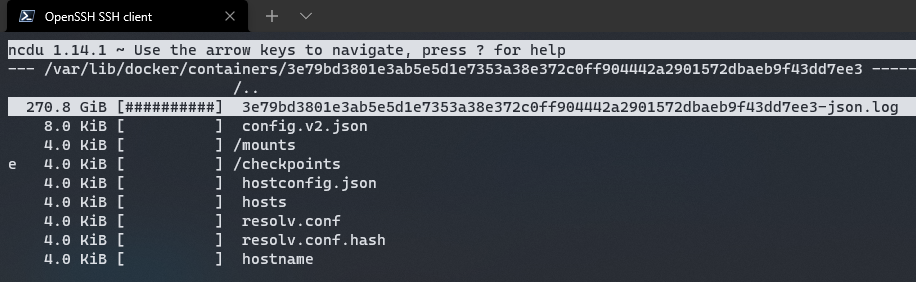
Before you get started, Clair has a habit of writing a LOT of data to the log.
I highly recommend modifying your Docker daemon.json to limit the size
of the log files. Documentation for that is
here. Example:
I had my daemon.json file set to the default (empty) settings. I found out the
hard way that this will allow a single log file to grow infinitely.
To setup Clair, you first need to configure Quay. Relaunch the Quay configurator and enable vulnerability scanning. You also want to generate a pre-shared key (PSK). Copy this value. Save the configuration and copy it back into the container.
For Clair, setup a PostgreSQL database for it, just like Quay. You will need
to manually create a settings file for Clair (much like Quay) and copy it
into /config of the Clair container. See Clair Config for
my configuration or
Quay’s documentation
for another example. The full reference can be found
here. Clair has 3 pieces, the
indexer, matcher, and notifier. The easiest and simplest configuration is to
run all 3 at once in the Clair container. Enable this by setting the CLAIR_MODE
environment variable to combo. Now, launch the Clair container.
 1services:
 2  app:
 3    image: quay.io/projectquay/quay:latest
 4    ports:
 5      - 80:8080
 6      - 443:8443
 7    restart: unless-stopped
 8    volumes:
 9      - app_storage:/datastorage
10      - app_config:/conf/stack
11      - app_log:/var/log
12      - app_tmp:/tmp
13
14  mirror:
15    depends_on:
16      - app
17    image: quay.io/projectquay/quay:latest
18    command: repomirror
19    restart: unless-stopped
20    volumes:
21      - app_storage:/datastorage
22      - app_config:/conf/stack
23      - app_log:/var/log
24      - app_tmp:/tmp
25
26  clair:
27    depends_on:
28      - app
29    environment:
30      - CLAIR_MODE=combo
31      - CLAIR_CONF=/config/config.yaml
32    image: quay.io/projectquay/clair:latest
33    restart: unless-stopped
34    volumes:
35      - clair_config:/config
36
37volumes:
38  app_storage:
39    driver: local
40  app_config:
41    driver: local
42  app_log:
43    driver: local
44  app_tmp:
45    driver: local
46  clair_config:
47    driver: local
That’s it! Assuming you configured everything correctly, Clair will automatically start scanning images already pushed to Quay and any new images.
If you get any “unable to analyze image” messages in Quay, this likely means there is a version mismatch between Quay and Clair. I would highly recommend to use the latest stable version of each, as that should always play nice. I would verify this works before pushing lots of content to your registry, as the only way to downgrade Quay is to wipe the database and start over.
In the Clair documentation, they mention Quay integration, but I have not figured this out, so I’ve stuck with the pre-shared keys.
Lastly, I’m not sure where the “official” images for Clair are. There are 3 different
repositories on quay.io alone that seem semi-official.
Configs
Here’s are the configs I’m using, verbatim, minus a few redactions.
Quay Config
  1ACTION_LOG_ARCHIVE_LOCATION: default
  2ACTION_LOG_ARCHIVE_PATH: /datastorage/registry
  3ACTION_LOG_ROTATION_THRESHOLD: 1w
  4AUTHENTICATION_TYPE: Database
  5AVATAR_KIND: gravatar
  6BITTORRENT_FILENAME_PEPPER: <autogenerated uuid>
  7BUILDLOGS_REDIS:
  8  host: redis
  9  port: 6379
 10CONTACT_INFO:
 11  - https://links.nathanv.me/contact
 12DATABASE_SECRET_KEY: <autogenerated uuid>
 13DB_CONNECTION_ARGS:
 14  autorollback: true
 15  threadlocals: true
 16DB_URI: postgresql://quay:<pass>@postgres/quay
 17DEFAULT_TAG_EXPIRATION: 2w
 18DISTRIBUTED_STORAGE_CONFIG:
 19  default:
 20    - LocalStorage
 21    - storage_path: /datastorage/registry
 22DISTRIBUTED_STORAGE_DEFAULT_LOCATIONS: []
 23DISTRIBUTED_STORAGE_PREFERENCE:
 24  - default
 25EXTERNAL_TLS_TERMINATION: true
 26FEATURE_ACI_CONVERSION: false
 27FEATURE_ACTION_LOG_ROTATION: true
 28FEATURE_ANONYMOUS_ACCESS: true
 29FEATURE_APP_REGISTRY: false
 30FEATURE_APP_SPECIFIC_TOKENS: true
 31FEATURE_BITBUCKET_BUILD: false
 32FEATURE_BLACKLISTED_EMAILS: false
 33FEATURE_BUILD_SUPPORT: false
 34FEATURE_CHANGE_TAG_EXPIRATION: true
 35FEATURE_DIRECT_LOGIN: false
 36FEATURE_GITHUB_BUILD: false
 37FEATURE_GITHUB_LOGIN: false
 38FEATURE_GITLAB_BUILD: false
 39FEATURE_GOOGLE_LOGIN: false
 40FEATURE_INVITE_ONLY_USER_CREATION: false
 41FEATURE_LIBRARY_SUPPORT: true
 42FEATURE_MAILING: true
 43FEATURE_NONSUPERUSER_TEAM_SYNCING_SETUP: false
 44FEATURE_PARTIAL_USER_AUTOCOMPLETE: true
 45FEATURE_PROXY_STORAGE: true
 46FEATURE_RATE_LIMITS: false
 47FEATURE_REPO_MIRROR: true
 48FEATURE_REQUIRE_TEAM_INVITE: true
 49FEATURE_RESTRICTED_V1_PUSH: true
 50FEATURE_SECURITY_NOTIFICATIONS: false
 51FEATURE_SECURITY_SCANNER: true
 52FEATURE_SIGNING: false
 53FEATURE_STORAGE_REPLICATION: false
 54FEATURE_TEAM_SYNCING: false
 55FEATURE_USER_CREATION: true
 56FEATURE_USER_LAST_ACCESSED: true
 57FEATURE_USER_LOG_ACCESS: false
 58FEATURE_USER_METADATA: false
 59FEATURE_USER_RENAME: true
 60FEATURE_USERNAME_CONFIRMATION: true
 61FRESH_LOGIN_TIMEOUT: 10m
 62GITHUB_LOGIN_CONFIG: {}
 63GITHUB_TRIGGER_CONFIG: {}
 64GITLAB_TRIGGER_KIND: {}
 65GPG2_PRIVATE_KEY_FILENAME: signing-private.gpg
 66GPG2_PUBLIC_KEY_FILENAME: signing-public.gpg
 67KEYCLOAK_LOGIN_CONFIG:
 68  CLIENT_ID: quay
 69  CLIENT_SECRET: <keycloak client secret>
 70  OIDC_SERVER: https://keycloak.nathanv.app/auth/realms/nathanv/
 71  SERVICE_NAME: Keycloak
 72LDAP_ALLOW_INSECURE_FALLBACK: false
 73LDAP_EMAIL_ATTR: mail
 74LDAP_UID_ATTR: uid
 75LDAP_URI: ldap://localhost
 76LOG_ARCHIVE_LOCATION: default
 77LOGS_MODEL: database
 78LOGS_MODEL_CONFIG: {}
 79MAIL_DEFAULT_SENDER: quay@nathanv.app
 80MAIL_PASSWORD: <email pass>
 81MAIL_PORT: 587
 82MAIL_SERVER: smtp.sendgrid.net
 83MAIL_USE_AUTH: true
 84MAIL_USE_TLS: true
 85MAIL_USERNAME: <email user>
 86PREFERRED_URL_SCHEME: https
 87REGISTRY_TITLE: Nathan Vaughn's Registry
 88REGISTRY_TITLE_SHORT: NVCR
 89REPO_MIRROR_INTERVAL: 30
 90REPO_MIRROR_TLS_VERIFY: false
 91SEARCH_MAX_RESULT_PAGE_COUNT: 10
 92SEARCH_RESULTS_PER_PAGE: 10
 93SECRET_KEY: <autogenerated uuid>
 94SECURITY_SCANNER_INDEXING_INTERVAL: 30
 95SECURITY_SCANNER_V4_ENDPOINT: http://clair:8080
 96SECURITY_SCANNER_V4_PSK: <generated key>
 97SERVER_HOSTNAME: cr.nathanv.app
 98SETUP_COMPLETE: true
 99SUPER_USERS:
100  - nathan
101TAG_EXPIRATION_OPTIONS:
102  - 0s
103  - 1d
104  - 1w
105  - 2w
106  - 4w
107TEAM_RESYNC_STALE_TIME: 30m
108TESTING: false
109USE_CDN: false
110USER_EVENTS_REDIS:
111  host: redis
112  port: 6379
113USER_RECOVERY_TOKEN_LIFETIME: 30m
114USERFILES_LOCATION: default
Clair Config
 1http_listen_addr: :8080
 2introspection_addr: :8089
 3log_level: debug
 4indexer:
 5  connstring: host=postgres port=5432 dbname=clair user=clair password=<pass> sslmode=disable
 6  scanlock_retry: 10
 7  layer_scan_concurrency: 5
 8  migrations: true
 9matcher:
10  connstring: host=postgres port=5432 dbname=clair user=clair password=<pass> sslmode=disable
11  max_conn_pool: 100
12  run: ""
13  migrations: true
14  indexer_addr: clair-indexer
15notifier:
16  connstring: host=postgres port=5432 dbname=clair user=clair password=<pass> sslmode=disable
17  delivery_interval: 1m
18  poll_interval: 5m
19  migrations: true
20auth:
21  psk:
22    key: <generated key>
23    iss: ["quay"]
24trace:
25  name: "jaeger"
26  probability: 1
27  jaeger:
28    agent_endpoint: "localhost:6831"
29    service_name: "clair"
Docker-compose.yml
 1version: "3"
 2
 3services:
 4  app:
 5    image: quay.io/projectquay/quay:v3.6.0-alpha.9
 6    labels:
 7      - "traefik.enable=true"
 8      - "traefik.http.routers.quay.rule=Host(`cr.nathanv.app`)"
 9      - "traefik.http.routers.quay.service=quay"
10      - "traefik.http.services.quay.loadbalancer.server.port=8080"
11      - "traefik.http.routers.quay.entrypoints=secure"
12      - "traefik.http.routers.quay.tls=true"
13      - "traefik.http.routers.quay.tls.certresolver=le"
14      - "traefik.http.routers.quay.tls.domains[0].sans=*.nathanv.app"
15    networks:
16      - default
17      - db_net
18      - proxy_net
19    restart: unless-stopped
20    volumes:
21      - app_storage:/datastorage
22      - app_config:/conf/stack
23      - app_log:/var/log
24      - app_tmp:/tmp
25
26  # config:
27  #   image: quay.io/projectquay/quay:latest
28  #   command: config secret
29  #   labels:
30  #     - "traefik.enable=false"
31  #   networks:
32  #     - default
33  #     - db_net
34  #   ports:
35  #     - 8080:8080
36  #   volumes:
37  #     - app_config:/conf/stack
38
39  mirror:
40    depends_on:
41      - app
42    image: quay.io/projectquay/quay:v3.6.0-alpha.9
43    command: repomirror
44    labels:
45      - "traefik.enable=false"
46    networks:
47      - default
48      - db_net
49    restart: unless-stopped
50    volumes:
51      - app_storage:/datastorage
52      - app_config:/conf/stack
53      - app_log:/var/log
54      - app_tmp:/tmp
55
56  clair:
57    depends_on:
58      - app
59    environment:
60      - CLAIR_MODE=combo
61      - CLAIR_CONF=/config/config.yaml
62    image: quay.io/projectquay/clair:4.1.0-alpha.3
63    labels:
64      - "traefik.enable=false"
65    networks:
66      - default
67      - db_net
68    restart: unless-stopped
69    volumes:
70      - clair_config:/config
71
72volumes:
73  app_storage:
74    driver: local
75  app_config:
76    driver: local
77  app_log:
78    driver: local
79  app_tmp:
80    driver: local
81  clair_config:
82    driver: local
83
84networks:
85  db_net:
86    external: true
87  proxy_net:
88    external: true
Conclusion
I’m extremely pleased with how this came out. I basically have my own little Docker Hub
on my domain and my own server. If you want to look at it for yourself, go to
cr.nathanv.app (yes, I could have bought a short domain
such as nvcr.me for this, but I rather use a subdomain of my already-existing short
domain. See my rant on that here:
Stop Using So Many Domain Names).
It’s got OIDC authentication, a public web UI, vulnerability scanning, support for the
library namespace, all-in-one.